 The Nokia N97 was released ‘sim-free’ in the UK a week before it was available for purchase on contract with the mobile networks. I chose to purchase the N97 in black and I am tied into an 18 month contract for it. For those interested, the handset was £29.99 on a £35 a month tariff including T-Mobile’s Internet add-on. Yes, I paid for it but whether paid for or not, I can be just as critical or praising of a product. Over a few articles I will write about the handset, software, shortcomings and improvements. Today, I start with my observations of the handset itself.
Upon opening the package, you see the handset, battery and stylus presented on the top layer of within the box. Below were the USB cable, charger and charger convertor (for current non-USB Nokia chargers). Also in the box was a £20 Nokia Music Store voucher along with an installation CD for the Ovi Suite and the standard manuals and leaflets advertising other features. The handset was lighter than I expected, it didn’t have the feeling of density like a handset such as the n95 or 6120, and felt as if there was some air/space within the handset, at this point the battery and SIM hadn’t been installed.
The Handset  The battery cover has a matt finish to the plastic , which is shared with the main chassis of the phone. It provides fair grip (but none when hands are bone dry!) and fingerprint resistance (an insignificant concern for me), as long as you haven’t just eaten a chicken wing. The camera cover on the rear is a square sliding piece of what seems like painted metal but may just be the finish that makes it feel like so and has a small band of blue colour on the edge which matches the highlights on the keyboard. Under the sliding lens cover is the camera which is set under a clear piece of plastic, with an opening for the dual LED flash.
 Along the edge of the main body, there are several buttons. Starting at the top, next to the central 3.5mm headphone jack, is the power button, small, silver, plastic and sitting flush with the body of the phone. Along the left side starting at the top corner, there is a speaker, inset into the handset, the mesh is visible and the whole thing
  will be a housing for dust. Further down the left side is the Micro USB socket for data transfers and charging, next to which is a small dot which lights up white when charging. Halfway down the left side is the sliding unlock switch. The switch is raised from the body of the phone with three raised ridges and made from plastic. It is spring loaded so sliding it downwards unlocks the handset and then it springs back up into place. At the bottom of the left side is the second speaker.
  On the bottom edge of the phone, halfway along is a notch where a nail can be used to prise off the battery cover. To the right of this is a recess for the microphone. Along the right side of the handset from the bottom, there is a matt silver camera button with a picture of a camera printed on in matt white paint. Further up the right side of the phone
  are the volume/zoom buttons, again finished in matt-silver. It is a simple, single piece rocker button but with the ‘up’ button having a small raised circle and the ‘down’ button having a recessed circle, so they can be identified by touch alone. Above the plastic black surround which makes up the main chassis of the handset, is a thin matt-silver lip running all the way around the edge where the fold up screen makes contact with the main body of the phone.
 The screen unit is a single piece making up around a third of the phone’s body thickness and attached to the main chassis only by the hinge mechanism and a thin ribbon cable. The screen unit or the ‘lid’ has a dark chrome surround which might anger the fingerprint resistance mob. On the face of the phone screen in the top left corner is the proximity sensor, used to deactivate the touch-screen if you are taking a call. The last thing you want is to be hanging up or deafening yourself by activating the loudspeaker with your cheek. In the middle, next to the proximity sensor is a long slit under which sits the earpiece, another bum-fluff trap,. In the top right corner of the front is a lower res camera and light sensor. Below the widescreen 640 x 360, 3.5 inch display there are three more controls. In the bottom left corner there is a silver pill shaped, chrome effect plastic button which has a white backlight that pulses on and off for notifications, or can be set to pulse as normal. To the right of this, are the green and red pick-up/hang-up touch keys.
 Opening up the phone is a simple case of holding the phone in a landscape fashion, with fingers keeping a grip of the main chassis of the handset and thumbs pushing the left side (which now faces you) of the dark chrome surround away from yourself. The pressure forces the hinge mechanism to rise and take the screen with it and then lock in what seems like a 45 degree angle. The lid opens with a nice solid thud and this is because of two rubber plugs that the lower edge of the screen bumps and rests against when in the raised position. When closing the screen the same applies again at the top edge of the screen, with another two rubber pads providing a buffer to dampen the action. Not a real major issue but be careful not to push too hard with this mechanism and ensure you have a good grip near the top of the phone when opening, or it may slip out of your grip and onto the floor!
 When the screen is in the raised position, the ribbon cable can just about be seen from the side and a large hinge mechanism which also acts as a barrier to prevent anything entering the area below the screen where the ribbon is folded. The larger part of the hinge mechanism looks and feels like a solid piece of metal. It has some of the highlight features of the phone listed along it in white paint, such as 32GB, A-GPS, WLAN and FM RDS. With the screen raised, the surface of lower chassis is exposed upon which there is the phones keyboard and directional buttons.
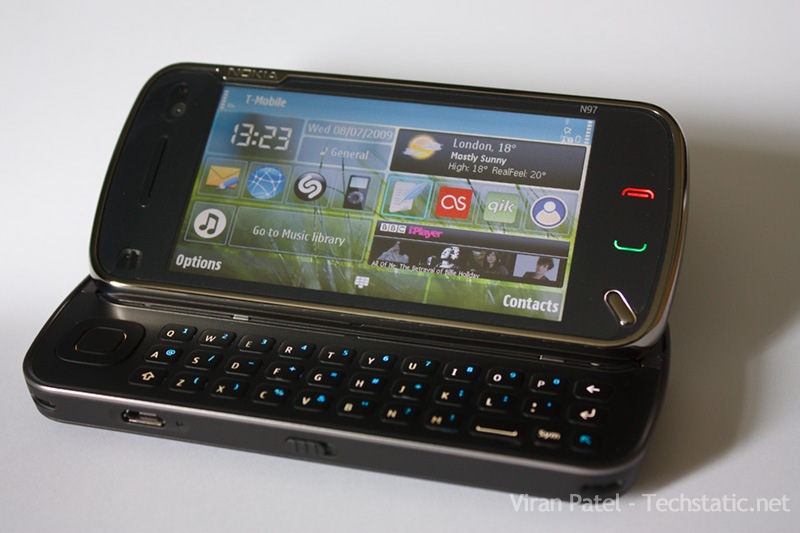
 The 33 key keyboard and directional pad with a button in the centre seem to be made of plastic with a texture on them that makes them feel slightly rubberised. On the black version of the N97, the keys are black, with white for the main characters and blue for the alternate characters such as numbers and brackets etc. The spacing of the keys isn’t like a conventional keyboard with they keys staggered on each row. Instead the alignment is like a grid, with the keys directly aligned below each other. The only place this varies is the bottom row of the keyboard where the Space bar takes up the width of 1 and a half keys and is located on the right side of the board. The Symbol button and Blue Arrow button being two thirds the width of a normal button. The Symbol button brings up the list of characters and symbols on screen and the blue arrow key allows the selection of the blue characters on the keyboard. The shift key on the left side of the keyboard functions like a traditional shift key.
On the far left side of the keyboard is the directional pad. It is a rounded square with a button for selection in the centre. No good for gaming if you are the type to roll your thumb around a d-pad. It is more suited to the lift and poke style of control, otherwise you risk pressing the central select button.
Removing the rear cover for the phone had me concerned that the clips or cover might be damaged over time, especially if you are a traveller and frequently changing SIMs. Instead of a solid sliding action, a sliding clip or release button, the rear cover is a partially flexible plastic which must be prised off, an action that releases the clips along the sides until you reach the top edge near the camera. The SIM card requires the battery to be taken out. Along the top edge of the battery tray, there is a small metal lip, which when pulled out reveals the SIM tray. drop the SIM card in and push the tray back in, job done. Also under the battery cover, near the camera is the memory card slot, which lets you increase the storage using a Micro SDHC card. Current marketing and specs say the phone can have up to 48GB of storage, indicating that the phone has been tested with a 16GB card. No doubt larger cards can be used as long as they are standards compliant. Placing the back cover on requires slotting the top end in above the camera and the forcing the clips back in along both edges of the phone until flush. There is no particular skill required here other than to align the two clips at the top of the cover and the whole process feels quite clumsy as opposed to the opening mechanism of the screen.
That’s it for today, more on the phone and how I am getting on with it in later articles. I will also provide some recommendations of apps that are compatible with S60 5th edition. As with all variations of the Symbian platform, there is usually bugger all by way of applications when a new version is available. This has been eased somewhat with the Nokia 5800 having been out for a few months but the developer community may have fragmented with the iPhone and Android platforms open to development.